Friday, May 29, 2020

Superhero Cape (How To)

One of my favorite things in the world is making something out of nothing... Giving value to something worthless...  Turning trash into treasure... Up-cycling. 

I'm not a great seamstress, but I can sew.
I'm not a how-to blogger, but I can't help being a teacher at my core.

That said, here's a little sewing how-to for you!
These were made from the backs of old colored tee shirts.

This one was made from an old red tee shirt and a white one dyed orange.
This one was made from silky nightgown material...
because my Millie is more twirly-swirly dancing princess than superhero.
Cut off the arms. 
They probably had holes or stains anyway
.
Cut down the neckline.
Use the arms for the shape and letter.
In hindsight, I wish I'd just dyed the whole sleeve and cut later.
Hot water, salt, and swish.  It doesn't take much!
Glass bowls on the counter is probably a bad idea, but I lived dangerously.

Make sure it all gets covered,
unless you want it to be splotchy.
The longer it sits,
the darker it gets.
Dry it. Iron it. Use fusing to hold the shape in place.  
Zig-zag or use a fancy stitch all around the shape and letter.
Rip all the stitching out when you realize you should have done a tighter stitch .
Be mad at yourself. Start over.
Sew right sides together leaving the bottom open.
Because you're using tee shirts, the bottom should already be finished.
Turn right side out. Press seams neatly.
Sew same zig-zag or fancy stitch all around the edges,
but don't mess it up this time.
Stitch Velcro to the front of one neck piece and to the back of the other.

Saturday, May 23, 2020

Feeding Ducks with Dad-Dad


Oh, how I love an image that tells a story! 
I could explain what's going on here, but would I do that? 
There's no need to see her grin or hear her squeals to know to know she's delighted.
I don't think she's the only one who's delighted.  So is her great grand father.  And, probably the ducks are too!!

My friend Michelle sent me an old photo that she'd come across and asked me if I'd paint it.  Of course I loved it immediately!  It's exactly my kind of image... one that tells a story.

I actually know that little girl; she has a little girl about that size of her own now. However, I asked Michelle to tell me about the man. She said it was her grandfather who they called Dad-Dad. She said, "He would put those coveralls on after work.  He loved to garden and most important to spend time with his grands and greats.  When I struggled in Spanish, he got some tapes and learned along with me.  He was so amazing!" 

Original Oil Painting on 12"x 16"
[SOLD]

Thursday, May 21, 2020

My Art Studio

I love seeing where other people do their art, their creative spaces.  
Recently I spiffed mine up! I organized, tidied, straightened, tossed, and cleaned.

My place for doing artsy and crafty things is called The Fonzie Room.  (You remember Happy Days? The Fonz lived in the room above the Cunningham's garage.)  When it was the kids' play room and later their teenage hang out, it was the  Fonzie Room.  After they grew up and moved away, I made it into an art room.  
I decided then that I'd change its name... I would have called it The Garret, but I once had a super annoying student with that name, so that was out.  

I picked The Atelier.   It's a French word that means an artist's workshop, an art studio, a space for creativity to flourish.  What a perfect new name!
It has a French pronunciation, but if you use your best Southern redneck accent and exclaim, "I tell ya!"  then you've pretty much got it.

I tried, but the change never took.  It will always be The Fonzie Room.
At the top of the stairs, before you enter, you pass this little sign on the wall.
It's filled with things that make me feel happy and creative...
... from one end to the other.
I've painted sitting in this purple chair so many hours.
From left to right I've got everything I need: a small table for my palette... a dinosaur head squirter for the too curious cat... a photo viewer for my reference pictures... and easel for the canvas... way too many brushes (why don't I throw some away!)... a foot stool because I'm short... speakers for listening to an audio book or country music... drawers holding tubes of paint, blot scraps, rulers, palette knives, pens and all the other painting tools... and a computer.

Buff Kitty is lounging and bathing himself on the tables where my painting partners used to be and will be again as soon as COVID-19 worries are behind us!
Even the corner behind the elliptical machine.
From bottom to top every inch is filled: fabric... yarn... more fabric... a No Whining sign that used to hang in my classroom...  paintings that wait for someone to give them a forever home... Wampum necklaces that tell the stories from the most memorable events in my life... and a few school mementos...

So much (very important, yes-I-do-need-it-all) stuff!
You can ask about any specific thing, and I can tell you the story behind it and why I want it always. Lots of supplies and materials are stored inside those cubbies.
This corner holds my sewing machine, serger, irons, and all the "stuff" that goes along with that. Next is my Cricut and all of its "stuff."  There's a story behind every single thing on the wall there.  Just ask if you want to know! I'll tell you one....  See that off-white bread box.  It sat on my mother's counter for as long as I can remember.  Now it holds very important artist needs... (like gum, almonds, chocolate, candy corn, pretzels...)
I've been talking to my dear friend who used to teach writing with me.  We were talking about the word "stuff."  Usually you can find a much better word, but sometimes, you just need the word "stuff." This corner has all my other "stuff."  I'll point out a couple.  My bags from Welcome Home Retreat are hanging there ready to be filled and taken for a weekend of crafting!  The fishing tackle tower of drawers is filled with buttons.  They were my mom's.  I don't use buttons often, but I sure do love coming to the top of my stairs and seeing them as I enter The Atelier,  I mean, The Fonzie Room.
If you scroll up and look again, you'll see that I have a thing for wind chimes.  There's one above each work station.  You never know when you need to celebrate an accomplishment!
(I got this particular one last week for my 35th wedding anniversary!)
Hmmm... Buff... What are you doing?

Any guess as to what my favorite two colors might be?
I would love to see your art space!

Monday, May 4, 2020

Homemade Pickles You'll Relish

 
It just so happens that I make amazing pickles.
How about if I share my instructions and recipe!
... From the very beginning...
STEP 1
Buy pickling cucumber seeds (not burpless) and plant them in cute little greenhouse pods.

 Even if you want to water them lots, don't or you'll drown half of them like I did.
Put them in a sunny room with a door to keep the curious cat out of them.
Turn them around each day since they will lean toward the light.
STEP 2
Transfer them to something bigger with more soil as they grow.
If you have a bad habit of getting a Coke at Sonic, reuse those cups.
Keep the soil moist. (And keep the cat out of the room!)
STEP 3
Shovel your year's worth of chicken litter across the garden.
Sprinkle the fertilizer  you bought all across it as well.
* Notice that the onions in the barrels are growing nicely already.
STEP 4
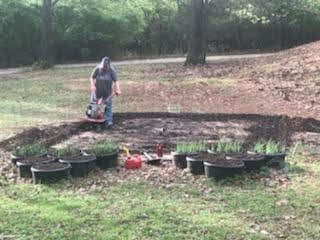
Till the garden going around and around.
Toss out the rocks. (Where do those come from! I know I got them all last year!)
You'll know you're finished when the tiller runs out of gas.
STEP 5
Borrow your son's truck to pick up a load of mulch.
Cover the whole garden bed one shovelful at a time.
STEP 6
Be proud of a job well done.
Take a picture. 

Take a shower.
Take an ibuprofen because your back is probably killing you.
STEP 7
Plant the cucumber plants inside big homemade cages.
Every day train the plant to grow up instead of out.
Put the new runners up on the inside of the cage. 
STEP 8
Train the cucumber vines up the inside (instead of the outside edges) of the cage.
If you forget this step, the deer will help by eating whatever their noses can reach.
The cucumbers will hang down as they grow and are ready to be picked..
They can grow fast, so check every day!


STEP 9
Pick them before they get big and fat like Willy Wonka's snozzcumbers!
While you're still wearing your garden gloves, rub all the little pricklies off their skin.
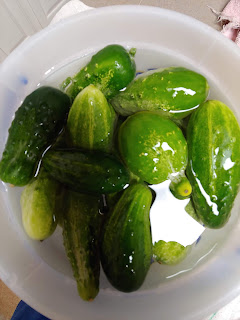
Wash them, peel them, (feed the peels to the chickens), take a picture.

STEP 10
Eat them for every meal and every snack without guilt.  They have zero calories.
Unless you skipped STEP 8 and shared your vines, leaves, and blooms with the deer, 

you will eventually get tired of eating them raw 
no matter how many different ways you slice them.

STEP 11
It's time to turn the extra cucumbers into pickles.
STEP 12
Pull some onions. You'll need those too.


My Recipe
It's not exact... Use more or less of each ingredient as you please.
  • Thinly sliced cucumbers (a bucket full... 6-ish cups)
  • Thinly sliced onions (a bowl full... 1+ cups)
  • White vinegar (to cover... 1 1/2 -2 cups)
  • 1 cup sugar
  • 1/2 teaspoon salt
  • 1/2 teaspoon mustard seeds (yum... those little ball things... add extra!)
  • 1/2 teaspoon celery seeds (can't imagine anything good could come from celery...but anyway... just put them in.)
  • 1/2 teaspoon ground turmeric (the stuff that turns it yellow-ish)

  • Combine vinegar and spices in a saucepan
  • Bring to a boil for a minute while stirring 
  • Pour vinegar mixture over cucumber and onion slices
  • Cool, cover, and marinate in refrigerator
If you need relish, just take some out and chop it up!

The inspiration for this painting came from Sara's photograph, Relish the Moment, on Inspiration Collaboration.

Original Oil Painting on 10"x 10" Wrapped Canvas.
Click Homemade Pickles if you'd like to purchase this painting.

Friday, May 1, 2020

Inspiration Collaboration - May 2020

Four new Inspiration Images are up for May!
Join us at Inspiration Collaboration!

Have you participated yet?  Oh, how I wish you would!  It inspires me to see all the creativity and the diversity of final products submitted.  If you want a quick peek at all of the submissions lined up with their groups, click HERE.  Then scroll on down to see how you can join us this month! 

It's easy to be a part of this creative community.
  1. Click over to Inspiration Collaboration to get a better look at the four new Inspiration Images and read the stories behind each one.
  2. Choose one that inspires you to create.
  3. Make it!  (Make it with paint... or wood... or yarn... or fabric... or words... or a camera... or clay... pen and ink... or... )
  4. Take a picture of your art and send it to us!
You'll find everything you'll need to know  when you click Instructions for Submission.